google-site-verification: googleffe3ebaef4e4b443.html Oztayls-Restoring and sailing a vintage scow Moth

26 February 2014

South African Dabchick scow

This is the little high performance 12 foot Dabchick that most South African kids cut their sailing teeth on. I learned to sail on these and I helped my dad build a few for our club in the late 60's. They are super exciting to sail and as they have very little freeboard, the sensation of speed is even greater. At 16, kids must exit the class.

It's a boat that all the parents want to sail once the breeze hits 18 kts. Check out this video.

Dabchick sailing


20 October 2013

First sail of restored Max Headroom

On Saturday 5th October I took Max to Grahamstown Lake near Newcastle, NSW. The lake is fresh water fed from both runoff and the Williams River and provides Newcastle with most of its water supply. No power boating or swimming is allowed, unless forced by a capsize that is!

Conditions could not have been more ideal for a first sail. Great sunshine, warm day and a moderate Nor'wester of 12 kts.

I was very happy with the boat, which has plenty of pace and I had a number of exciting reaches. Upwind performance is amazing.  For a shakedown sail, it was ideal. Nothing broke (touches wood for next time), so I could not be happier for all the work I put in!

Here is a video taken from a head mounted camera. I apologise for the somewhat jerky motion so I'll remember to try to keep my head more still next time.


04 June 2013

Control lines

The control lines had seen better days so I ordered some 4mm Spectraspeed. I like this stuff very much as it is tough and has a hard low friction cover plus it does not distort and flatten as it goes around a turning point, so it performs more like a 3mm line. Nice.

The bottom of the mast had a 3/16” SS wire rope loop with five 19mm Ronstan ferruled head blocks threaded onto it for the Cunningham (downhaul), and the outhaul. The problem with this arrangement was that I found that the SS wire rope was too rigid and did not allow the blocks to properly align with the lines, so there was friction as the lines travelled through twisted blocks. I decided to remove the wire loop and replace with 3mm Dyneema. I also thought it would be cool to replace the old 19mm ferruled head blocks with lightweight Ronstan kite blocks, which have a working load capacity of 150kg and break at 300kg. Pretty impressive little blocks these. The only problem was that they have a maximum line capacity of 3mm, and I had bought 4mm. Bummer, can’t use the kite blocks here. For now, the old blocks have been returned to service, threaded onto the Dyneema loop spliced around the base of the mast. All three control lines run to clam cleats mounted on the wings where they can be adjusted while hiked.

Cunningham/downhaul:
I spliced the two upper blocks of the Cunningham to some 3mm Dyneema which are in turn attached to a hook which clips to the Cunningham eye on the sail. This makes rigging/de-rigging easier. The Cunningham system (yellow line) is a good 8:1, which is enough power.
IMG_1007IMG_1016

Outhaul:
I also replaced the outhaul line inside the boom with 2mm Spectraspeed. Where it exits the boom, I replaced the old Ronstan 19mm loop headed block with a #6 Wichard FRX ring. These rings are pretty cool replacements for control line blocks in situations like this. They are made of a very strong alloy and have a tough, low-friction coating. I like that they have no working parts and have a redundancy factor, ie. if they were to break, the control line will still work, just with more friction. The outhaul control line is the blue one.
IMG_1003IMG_1007

Vang/Kicker:
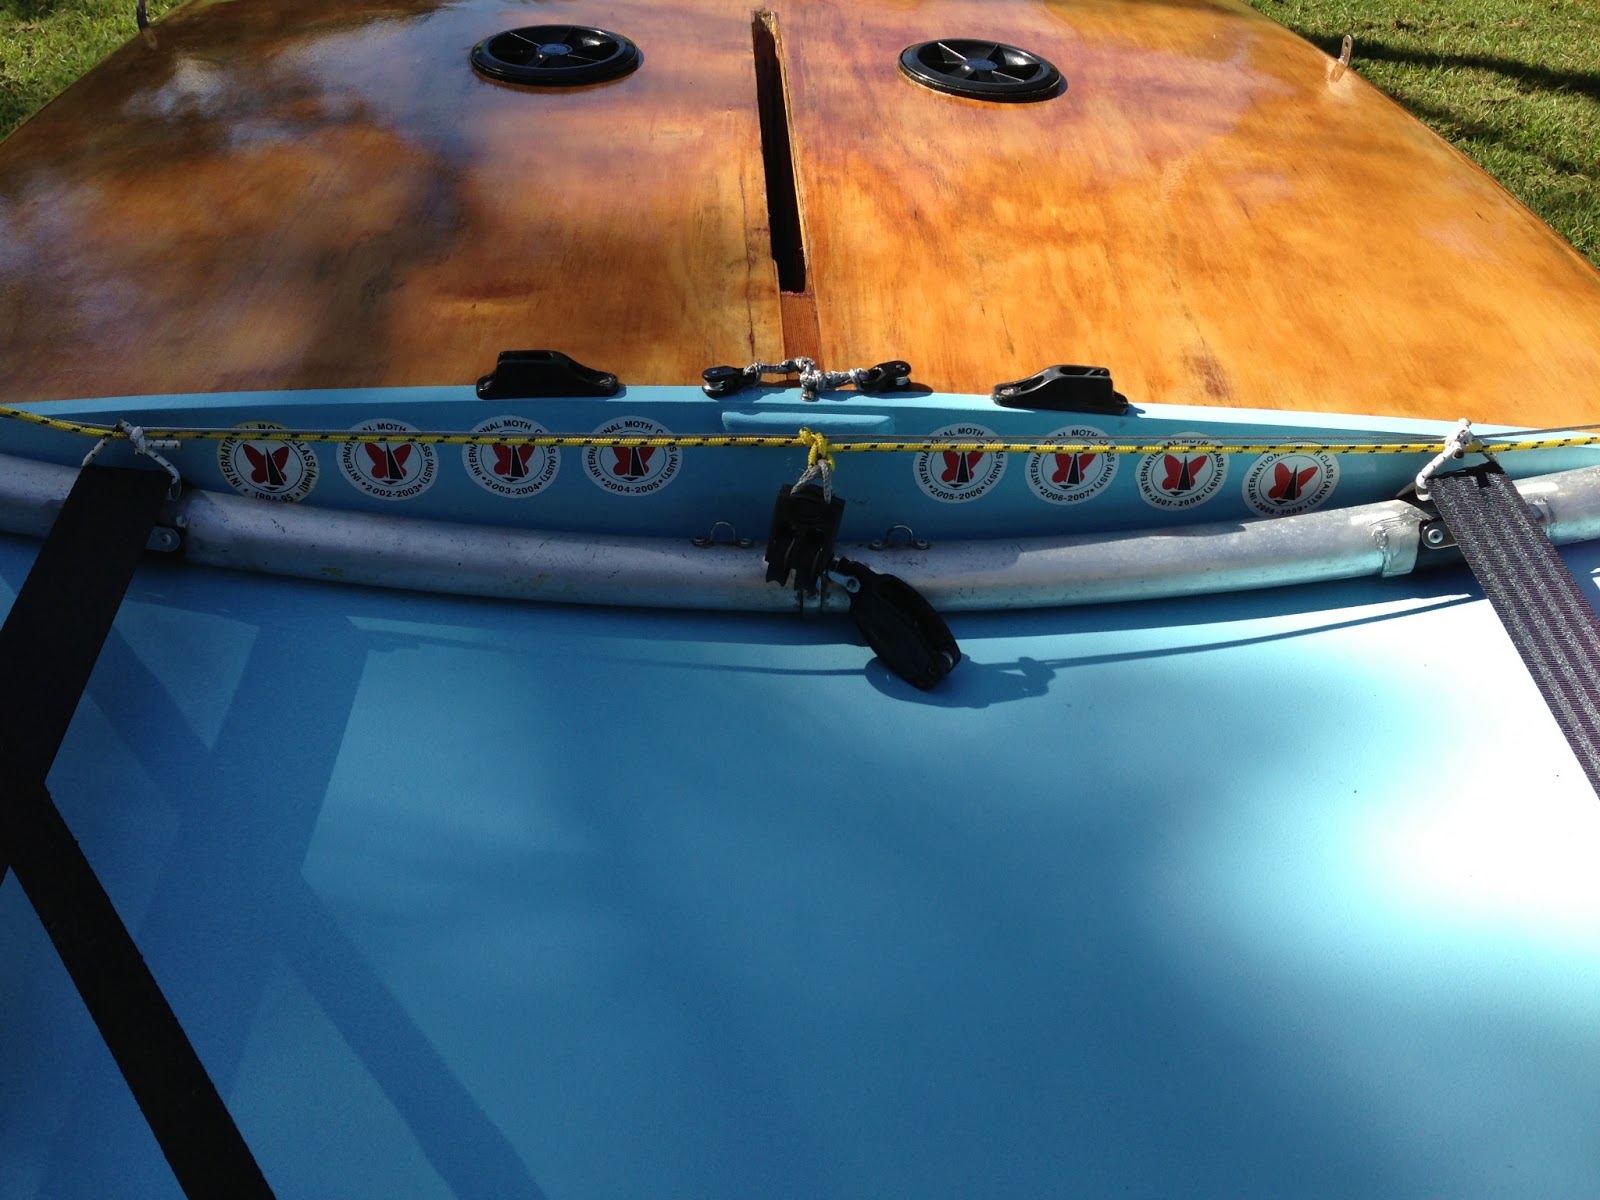
The lever style vang is very powerful, and the the only concern I have at the moment is whether it will interfere with the daggerboard when gybing. I’ll have to watch that. I have installed a Dyneema loop around the boom and this loop attaches to the lever. The other primary Dyneema line (3mm) attaches to a shackle on the mast foot. Also attached to this shackle are two FRX rings spliced onto 3mm Dyneema. The red control line runs through three FRX blocks as you can see in the pic above and then run to the clam cleats fixed to the wings. The pic above shows the vang lever. In the pic below you can see on the left the blue Dyneema loop around the boom for the vang attachment which also passes through an eye to fix it in place. The other 2 loops to the right are the hangers for the mainsheet blocks. I have no idea how to calculate the mechanical advantage of this system, but I estimate it to be about 16:1.
IMG_0971
IMG_1008IMG_1005

The pic below shows the attachment of the clew to the outhaul. I may add a shackle here to make it easier to rig the 2mm Spectraspeed line to the clew. 2mm line can be a bit of a fiddle to untie! I also replaced the SS wire outhaul traveller line with 3mm Dyneema which has spliced loops at the ends for smooth attachment points that won’t interfere with the running block. The traveller is tensioned with an eyebolt at the inboard end. A 19mm loophead block facilitates smooth running along the traveller. Also, a thin bungee cord tied to the shackle to act as an inhaul will be fitted.
IMG_1014 

Unfortunately the Dyneema loop around the base of the mast to which the Cunningham and outhaul blocks are attached is not removable at the moment. I will think about modifying this arrangement so that this loop can be attached with a clip. If I do this the control lines can remain attached which will make rigging/unrigging so much faster!
IMG_1011

Well, that’s the control lines all sorted. Smile

02 June 2013

New shrouds

I found a few broken strands in the stainless steel wire shrouds, so they need replacing. The working life of ss wire stays is around 10 years and you can’t see inside the ferrules anyway, so it makes sense to make new ones.

On the Storer Boats forum there has been a lot of discussion about using Dyneema for stays, with the most likely candidate being the relatively new Dynex Dux 75 which is being manufactured by Hampidjan in Iceland. It is basically the same as ordinary SK75 Dyneema (made from a high molecular weight polyethylene), but after further proprietary treatments by Hampidjan it becomes 20-40% stronger. More importantly however than outright strength increases, it has much lower stretch and creep than SK75. It sounds ideal for replacement of stainless steel rigging then, and this is indeed the case with large boats. The only problem for us dinghy sailors is that the smallest diameter made is 5mm, which is really thick for a little Moth. Hence I then decided to go the old tech route and make up a new set from 1/8” ss wire rope. To be more specific I chose the more flexible 7 X 19 variety. You also need thimbles and ferrules in the right size. I chose nickel plated copper ferrules because they look nicer and won’t go green in salt water.

Only a couple of basic tools are needed. The important one is a heavy duty swaging tool. I was able to hire one from the supplier of the wire for $15. You also need a cutter, and I was lucky that I had a bolt cutter because the swaging tool did not have a built in cutter like they usually do.

The tool above is the Bolt Cutter and the one below is the Swager. Normally you would use a Wire/Cable Cutter as they are a sharper tool, but a bolt cutter works reasonably well too.

IMG_0988

With the tools sorted, I thought about how to make the new stays exactly the same length as the old ones. My solution is quite simple. All you need is a suitable length of timber floor and then drive a screw through each eye into the floor to stretch out the stay nice and taught. I used our deck out the back but you could use your spiffy wooden loungeroom floor when your wife isn’t looking Smile.

IMG_0983

Make up the first eye and slip it over the screw. Then using the old stay as a template it is dead easy to make your new wire exactly the same length.Use a marker pen to mark where you need to cut the wire. You want to ensure that no wire sticks out past the end of the ferrule, as otherwise you will have to tape them up to avoid being cut by the ends of the wire strands. Here you can see I managed to do a pretty good job.

IMG_0984

Well, an hour later and I have 3 new stays ready to attach to the mast. Dead easy! Smile

IMG_0987

For a video on how it’s done, check out YouTube: http://youtu.be/ok9lHZGPSGA

Spreaders

A common method used for spreaders in the 60’s and through to the 90’s was to make up the spreaders by riveting together some 1” x 1/8” aluminium bar and have them articulate at a fitting on the mast. In this way the spreader remained fixed relative to the stays while the mast was free to rotate.

This is what mine looked like. Likely it had been trodden on a few times to many in the boat park as they were pretty buckled and some cracks were also appearing under the tape. Time to replace them I think.

IMG_0687

IMG_0688

My original thoughts were make up a three pronged spreader from 6mm 5-ply that I have lying around from the remnants of the Goat Island Skiff project. Then glass these to stiffen them. Another way would be to laminate the ply and then shape them like foils. They would be light and strong. But I also had lying around some fibreglass sail battens and so I started to think about a use for these. Singly they flexed quite a bit, but once glued together with some spacers laid at 90 degrees to the battens they became very stiff, so this is the way I went. The joints were epoxied and reinforced with Kevlar strands. Here is the completed spreader which is lighter and somewhat stiffer than than the old one. It may prove to be a disaster, but then again, it may not!

IMG_0954

01 June 2013

Rudder stock and tiller

I really like the design of the stock and tiller on this boat. It is very Mothie. What I mean by this is that it’s minimalist in every sense and super light. There is nothing superfluous or unnecessary in the design. The great thing too is that the rudder foil itself adds stiffness to its structure so that it becomes surprisingly stiff.

Essentially it is just 1/8” aluminium plate bent into a d shape.This is then riveted to another section bent to form a ] shape to make the pintle. A strip of ply is bonded to the underside of the section that forms the tiller and this is also cut out to make it even lighter! As I said, there is no unnecessary material in this sucker.

However, age had caught up with the structure and the ply had become delaminated from the aluminium, so it was a matter of cleaning off the old flaky epoxy and re-bonding the structure. That was basically all that was needed. I added a depth stopper for the pin so that would not drop down too far and drag in the water. This is just some black auto epoxy moulded around the pin.

I replaced the old aluminium tiller extension as it was somewhat bent and beat up looking. The new extension is simply a length of bamboo from the garden section of a local hardware store and costs just $2! For a few dollars more, I wrapped it with sports grip tape and also replaced the universal fitting as the original one had broken. Amazingly it is even lighter than the old aluminium one!

There is strip of marine carpet lining the top slot and a split clear plastic hose is sewn onto the bottom slot to provide grip. These were still in good condition so I left well alone.
IMG_0957
IMG_0976

Deck painted and fitted out

Due to the staining on the rear deck area I decided to paint this also. For anti-slip on other boats I’ve used sugar or caster sugar mixed in with the paint/polyurethane/varnish but this will be too rough on a boat such as the Moth. I found quite a good solution. Hempel Anti Slip Pearls which are quite cheap. It comes in two varieties. One is made from microscopic glass beads and the other is made from polyethylene beads. I chose the latter as they are not as coarse. You simply mix the pearls into the paint. The result is a nice matt looking finish. I mixed the pearls into the first coat of Toplac and then applied a second coat without the additive. We’ll soon know if this was a good idea.

For the foredeck I chose Norglass clear two-pack polyurethane. This is a high gloss finish and it’s possible to apply 2 coats per day using the wet on wet technique. However, I just went with 1 coat per day and applied 3 coats in all using a foam roller and tipping off with a synthetic brush. I rolled any excess clear coat onto the mast, so that is all nice and shiny now too.

With the painting done, I could replace the fittings. The Ronstan hatch cover O-rings were perished so I replaced those. The RF530 has been around since Adam was a boy and it’s great that you can still buy the o-rings and save the expense of buying new ones. This is a trap with a lot of other brands.

Also reinstalled were the wings. If you’ve been following this blog you will recall I had brazed up the corrosion holes and reinforced the particularly bad areas with tube sections which I brazed on. This was a big job but I think it turned out well. I replaced the old cotton webbing toe straps with new nylon webbing and attached bungees to keep them off the deck to make it easier to slide the feet under. Also, as the old wing covers had rotted, I had some new ones made by Redhead Sails on the NSW Central Coast. Lacing them on took me the best part of three hours. I must say they look very nice.

Well here he is:
IMG_0959

Max channelling a funnel web spider about to pounce:
IMG_0960

I was able to re-apply Max's registration stickers successfully. There is one missing as the glue came off the sticker and remained on the boat when I was removing them. Careful use of a heat gun for this job!


IMG_0958

I also gave Max some new graphics. I designed this myself as I wanted something a bit retro looking. I am quite please how it has turned out.
IMG_0981
IMG_0964

I also applied a cover strip to the dagger board slot. There are a few benefits from doing this.
  • it fairs the flow around the foil, reducing drag
  • it provides grip for the foil
  • it stops water spurting up through the case which robs performance
In my next post I will take a picture of the board in the slot to demonstrate. I have seen and used a number of products for this purpose and have even made my own, but this product is the best I’ve seen. Basically it is mylar film bonded to a fibreglass substrate and seems to have the right amount of stiffness. It is nice and smooth, less than 1mm thick and fairs itself to the contour of the board very nicely. It should work well I think.

Attaching the strip to the hull is simple. Cut it to the length required. I cut mine so that it overlaps the ends of the slot by a couple of cm. Then mark out and cut the slit the same length as the case. Use a sharp hobby knife with a new blade as this stuff is tough! Mask off the area where the tape will go and apply contact adhesive to both surfaces. Leave for 15-20 minutes and then apply the strip. Be careful to align it properly as you only get one go at this. Rub it hard to ensure a good bond and it’s done.
IMG_0951
IMG_0950
IMG_0953